A deck is a fantastic outdoor space, perfect for relaxation, entertaining, and enjoying the beauty of nature. But like any outdoor structure, your deck is constantly exposed to the elements, leading to dirt, grime, and potential damage. Maintaining your deck is crucial for preserving its beauty and extending its lifespan. This guide will walk you through the essential steps of cleaning and sealing your deck, ensuring it remains a welcoming and durable part of your home for years to come.
We’ll start with the basics of cleaning, exploring the different types of dirt and debris that accumulate and the importance of a thorough cleaning before sealing. Then, we’ll delve into choosing the right cleaning products and procedures for both wooden and composite decks. We’ll cover everything from choosing the right sealant to applying it correctly and maintaining your deck’s fresh, protected finish.
Deck Cleaning Basics

Cleaning your deck is the crucial first step in any deck sealing project. Thorough cleaning removes dirt, grime, and old finishes, ensuring the new sealant adheres properly and provides lasting protection. Neglecting this step can lead to a host of problems, ultimately shortening the lifespan of your deck and costing you time and money.
Importance of Cleaning Before Sealing
Cleaning your deck before sealing is paramount for achieving a beautiful and durable finish. A clean surface allows the sealant to penetrate the wood, creating a strong bond. Without proper cleaning, the sealant will adhere to dirt and debris, leading to peeling, blistering, and ultimately, premature failure of the sealant. This can result in the need for more frequent resealing and potential damage to the deck boards.
Common Types of Deck Dirt and Debris
Decks accumulate a variety of contaminants over time, each impacting the sealant’s performance. Understanding these types of dirt helps in selecting the appropriate cleaning methods.
- Organic Matter: This includes leaves, twigs, pollen, algae, and mildew. These materials trap moisture and can promote wood rot. Mildew, in particular, can be a persistent problem in shaded or damp areas.
- Dirt and Dust: Airborne particles and general foot traffic contribute to a layer of dirt and dust. This creates a barrier between the wood and the sealant, preventing proper adhesion.
- Grime and Stains: These can be caused by spills (food, drinks), pet waste, and other substances. They can penetrate the wood, causing discoloration and affecting the sealant’s appearance.
- Old Sealant and Coatings: Over time, previous sealant applications break down and flake off. These loose particles must be removed to ensure the new sealant can properly bond with the wood.
Consequences of Neglecting Deck Cleaning
Skipping the cleaning step before sealing can lead to several undesirable outcomes.
- Poor Adhesion: The sealant won’t bond effectively to a dirty surface, resulting in peeling, cracking, and blistering.
- Reduced Lifespan: The sealant’s protective qualities will be compromised, leading to premature wear and tear and requiring more frequent reapplication.
- Aesthetic Issues: Dirt and debris trapped under the sealant will create an uneven and unattractive appearance. The deck may appear dull, stained, or blotchy.
- Wood Rot: Trapped moisture and organic debris can accelerate wood rot, especially in areas with high humidity or frequent rainfall. This can lead to costly repairs or even deck replacement.
Cleaning Tool Comparison
Choosing the right cleaning tool is essential for effective deck preparation. Each tool has its strengths and weaknesses, so selecting the appropriate one depends on the deck’s condition and the type of dirt present. The following table provides a comparison of common deck cleaning tools.
| Cleaning Tool | Pros | Cons | Best For |
|---|---|---|---|
| Broom | Affordable, readily available, good for removing loose debris. | Ineffective for removing embedded dirt or stains, requires significant manual effort. | Light cleaning, removing leaves and loose dirt. |
| Scrub Brush | Effective for removing dirt and grime, good for scrubbing stubborn stains. | Requires manual effort, can be time-consuming for large decks, may damage softwoods if used aggressively. | General cleaning, removing surface dirt and mildew. |
| Pressure Washer | Powerful cleaning action, removes dirt, grime, and old sealant quickly. | Can damage wood if used incorrectly (high pressure, incorrect nozzle), requires caution and practice. | Thorough cleaning, removing stubborn dirt, grime, and old sealant. |
| Deck Cleaning Solution with Sprayer | Easy to apply, breaks down dirt and grime, prepares the surface. | Requires additional tool, can be corrosive, may require rinsing. | General cleaning and surface preparation before scrubbing or pressure washing. |
Choosing the Right Cleaning Products
:max_bytes(150000):strip_icc()/GettyImages-171326532-2000-8b7b60185750480fb0ef98e21473cfc9.jpg)
Selecting the correct cleaning products is crucial for effectively cleaning your deck without causing damage. The right choice depends on your deck’s material, the type of stains, and your environmental considerations. Understanding the different types of cleaners available and their ingredients will help you make an informed decision and maintain your deck’s beauty for years to come.
Deck Cleaner Types
Deck cleaners come in various formulations, each with its own strengths and weaknesses. Understanding the differences will guide your selection.* Cleaners with Bleach: These cleaners typically contain sodium hypochlorite, which is a powerful oxidizing agent. They are very effective at removing mold, mildew, algae, and general dirt.
Advantages
They are fast-acting and readily available, providing a quick solution for stubborn stains.
Disadvantages
Bleach can be harsh and can damage wood fibers, leading to a bleached appearance if used improperly. It can also kill plants and is corrosive to some metals. Use extreme caution around plants and protect any metal fixtures.
Cleaners with Oxygen Bleach
These cleaners use sodium percarbonate, which releases oxygen when mixed with water. They are a gentler alternative to chlorine bleach.
Advantages
Oxygen bleach is less harmful to the environment and safer for plants. It effectively removes mold, mildew, and general stains, although it may require a longer contact time than chlorine bleach.
Disadvantages
Oxygen bleach can be less effective on heavily soiled decks and may not be as quick-acting as chlorine bleach.
Cleaners Without Bleach
These cleaners often use detergents, surfactants, and other cleaning agents. They are designed to be environmentally friendly and safe for all deck materials.
Advantages
They are generally safer for plants, pets, and the environment. They are effective at removing dirt, grime, and light stains.
Disadvantages
They may not be as effective on tough stains like mold and mildew, and may require more scrubbing.
Environmentally Friendly Deck Cleaning Solutions
Choosing environmentally friendly deck cleaning solutions is a responsible way to maintain your deck while minimizing your impact on the planet.* Advantages: These cleaners typically use biodegradable ingredients, reducing their harm to the environment. They are often safer for plants, pets, and wildlife. Many are also formulated to be less corrosive and gentler on deck materials.
Disadvantages
Environmentally friendly cleaners may be more expensive than traditional cleaners. They may require more scrubbing or multiple applications to achieve the desired results. Some may not be as effective on tough stains.
Common Cleaning Product Ingredients and Their Effects
Knowing the ingredients in your deck cleaner and how they interact with different deck materials is essential for preventing damage.* Sodium Hypochlorite (Bleach): Highly effective at killing mold and mildew but can damage wood fibers, leading to discoloration and weakening of the wood. It can also corrode metal fasteners and hardware.
Sodium Percarbonate (Oxygen Bleach)
A gentler alternative to bleach. It is effective at removing stains and is less harmful to the environment and deck materials.
Surfactants (Detergents)
These ingredients help lift dirt and grime from the deck surface. They are generally safe for most deck materials but may require rinsing to prevent residue buildup.
Wood-Specific Cleaners
These cleaners often contain specialized ingredients to protect and nourish wood, such as wood oils and UV protectants. They can help restore the natural beauty of the wood.
Testing a Cleaning Product
Before applying any deck cleaner to your entire deck, it is crucial to test it in an inconspicuous area to ensure it doesn’t damage the surface or cause discoloration. Here are the steps to follow:* Choose a Test Area: Select a small, hidden area of your deck, such as underneath a railing or in a corner. This area should be representative of the overall condition of your deck.
Prepare the Surface
Lightly sweep or rinse the test area to remove loose debris.
Apply the Cleaner
Follow the product’s instructions for dilution and application. Apply the cleaner to the test area, ensuring even coverage.
Allow Contact Time
Let the cleaner sit on the deck for the recommended time, usually 10-15 minutes. Avoid letting the cleaner dry on the surface.
Rinse Thoroughly
Rinse the test area thoroughly with water, removing all traces of the cleaner.
Observe the Results
After the area has dried completely (usually 24-48 hours), inspect it for any adverse effects. Look for discoloration, fading, damage to the wood fibers, or any other changes to the deck’s appearance. If you notice any negative effects, do not use the cleaner on the entire deck. Choose a different product or adjust the dilution ratio.
Deck Cleaning Procedures
Cleaning your deck is a crucial step in maintaining its beauty and longevity. Properly cleaning your deck removes dirt, grime, and mildew, preparing the surface for sealing and protecting it from the elements. This section will guide you through the necessary steps for effective deck cleaning, covering both wooden and composite decks, and emphasizing safety throughout the process.
Cleaning a Wooden Deck: Step-by-Step Guide
Cleaning a wooden deck requires careful preparation and execution to avoid damage. Following these steps ensures a thorough and safe cleaning process.
- Preparation: Before you begin, clear the deck of all furniture, plants, and other items. Sweep the deck thoroughly to remove loose debris, such as leaves, dirt, and twigs. This initial sweep prevents these particles from becoming embedded in the wood during cleaning.
- Safety Precautions: Always wear safety glasses, gloves, and a mask to protect yourself from cleaning solutions and debris. Ensure proper ventilation. If using a pressure washer, wear closed-toe shoes and avoid directing the spray at yourself or others.
- Pre-Cleaning Inspection: Examine the deck for any loose boards, protruding nails, or signs of significant damage. Address these issues before cleaning to prevent further problems.
- Applying Cleaning Solution: Choose a deck cleaner appropriate for your wood type. Follow the manufacturer’s instructions for dilution and application. Apply the cleaner evenly using a pump sprayer, garden sprayer, or a brush. Allow the cleaner to dwell on the surface for the recommended time, usually 10-15 minutes, but avoid letting it dry.
- Pressure Washing: Using a pressure washer is a common method for cleaning decks. However, using the correct pressure settings and techniques is important.
- Pressure Settings: For most wooden decks, a pressure between 1200 and 1500 PSI is recommended. Higher pressure can damage the wood, causing splintering or etching. Always start with a lower pressure and increase it gradually if needed.
- Technique: Hold the pressure washer wand approximately 6-8 inches from the deck surface. Use a fan-shaped nozzle for a wider spray pattern. Overlap each pass by a few inches to ensure even cleaning. Work in the direction of the wood grain to avoid damaging the wood fibers. Avoid holding the nozzle in one spot for too long, as this can cause gouging.
- Rinsing: Thoroughly rinse the deck with clean water using the pressure washer or a garden hose. Ensure all cleaning solution residue is removed.
- Drying: Allow the deck to dry completely, typically 24-48 hours, before applying a sealant.
Pressure Washer Techniques for Decks
Proper pressure washing techniques are essential to avoid damaging your deck. Incorrect use can lead to splintering, gouging, and other problems.
- Nozzle Selection: Use a fan-shaped nozzle with a wide spray pattern. Avoid using a concentrated or pencil-point nozzle, as these can easily damage the wood.
- Angle of Application: Hold the wand at a slight angle to the deck surface, following the direction of the wood grain. This helps to lift dirt and grime without damaging the wood fibers.
- Distance from the Surface: Maintain a consistent distance of 6-8 inches from the deck surface. Adjust the distance based on the pressure setting and the wood type.
- Consistent Movement: Move the wand steadily and evenly across the deck surface. Avoid pausing in one spot, which can cause the wood to be etched.
Correct pressure washing techniques are crucial for maintaining the integrity and appearance of your wooden deck. Improper techniques can lead to costly repairs.
Cleaning a Composite Deck
Composite decks, while requiring less maintenance than wooden decks, still need periodic cleaning. Here’s how to properly clean a composite deck, keeping in mind the specific considerations for this material.
- Preparation: Remove all furniture, plants, and other items from the deck. Sweep the deck to remove loose debris.
- Cleaning Solution: Use a composite deck cleaner or a mild soap and water solution. Avoid using harsh chemicals, abrasive cleaners, or pressure washers with high PSI, as these can damage the surface.
- Application: Apply the cleaning solution using a soft-bristle brush, sponge, or mop. Work in small sections to ensure thorough cleaning.
- Scrubbing: Gently scrub the deck surface to remove dirt, grime, and mildew. Avoid scrubbing too vigorously, as this can scratch the surface.
- Rinsing: Rinse the deck thoroughly with clean water using a garden hose. Ensure all cleaning solution residue is removed.
- Specific Considerations:
- Mold and Mildew: Composite decks are susceptible to mold and mildew growth. Regularly inspect your deck for signs of these and clean them promptly.
- Stains: Immediately address any stains, such as food spills or grease, to prevent them from setting.
- Avoid High Pressure: Do not use a pressure washer with high PSI settings. If you use a pressure washer, use a low-pressure setting (under 1500 PSI) and a wide-angle nozzle, holding the wand at least 12 inches from the surface.
Visual Guide: Optimal Method to Apply Cleaning Solutions
This visual guide describes the optimal method to apply cleaning solutions.
Image Description: The illustration depicts a top-down view of a wooden deck with a pump sprayer being used to apply the cleaning solution. The deck is divided into sections, showing the recommended application method. The pump sprayer is held at a consistent distance from the deck surface, and the spray is applied in an even, overlapping pattern. The direction of the spray follows the wood grain.
Arrows indicate the direction of the spray, showing a systematic coverage across the deck. A caption below the image reads, “Apply cleaning solution evenly, following the wood grain, using a pump sprayer or garden sprayer.”
Deck Drying and Preparation for Sealing
After you’ve meticulously cleaned your deck, the next crucial step is ensuring it’s completely dry before applying any sealant. This often-overlooked phase is vital for achieving a durable, long-lasting finish and preventing costly problems down the line. Rushing this process can lead to significant issues, negating all your hard work and potentially damaging your deck.
Importance of Complete Drying
Allowing your deck to dry fully is paramount for several reasons. The sealant needs a clean, dry surface to properly adhere. If moisture is trapped within the wood, it can prevent the sealant from penetrating and bonding effectively. This can lead to premature sealant failure, causing peeling, blistering, and a significantly reduced lifespan for your protective coating. Moreover, trapped moisture can promote mold and mildew growth beneath the sealant, leading to discoloration and structural damage to the wood over time.
Assessing Deck Dryness
Determining when your deck is dry enough for sealing requires careful observation and a few simple tests. Don’t rely solely on the weather; humidity levels and the type of wood also play significant roles.
- Visual Inspection: Examine the wood for any signs of moisture. Look for areas that appear darker than others, which often indicate trapped water. Pay close attention to shaded areas and areas that receive less direct sunlight.
- The “Splash Test”: Sprinkle a small amount of water on the deck’s surface. If the water beads up, the wood is not ready. If the water is absorbed quickly, the wood is likely dry enough.
- The “Tape Test”: Apply a piece of clear packing tape to the deck. If condensation forms on the underside of the tape after a few hours, the wood still contains moisture.
- Moisture Meter: For a more precise assessment, consider using a moisture meter. These devices measure the moisture content of the wood. Aim for a moisture content of 12% or lower for optimal sealant adhesion.
Potential Issues from Sealing a Wet Deck
Sealing a deck that isn’t fully dry can lead to a cascade of problems, each diminishing the aesthetic appeal and structural integrity of your outdoor space. These issues are costly and time-consuming to rectify.
- Blistering: Trapped moisture expands as it heats up, causing the sealant to bubble and blister.
- Peeling: The sealant fails to adhere properly to the wood, resulting in peeling and flaking.
- Mold and Mildew Growth: Moisture trapped beneath the sealant provides an ideal environment for mold and mildew to flourish, leading to discoloration and wood rot.
- Reduced Sealant Lifespan: The sealant breaks down prematurely, requiring more frequent reapplication.
- Wood Rot: Prolonged exposure to trapped moisture can cause the wood to decay, compromising the deck’s structural integrity.
Recommended Drying Times
Drying times can vary significantly depending on the wood type, weather conditions, and the amount of sunlight the deck receives. Following are general guidelines; always err on the side of caution.
- Softwoods (Pine, Fir): Allow 2-3 days of dry weather. In humid conditions or shaded areas, extend the drying time to 3-5 days.
- Hardwoods (Redwood, Cedar, Ipe): These woods are denser and may require longer drying times. Expect 3-7 days of dry weather.
- Weather Conditions: Hot, sunny weather accelerates drying. Cool, cloudy, or humid conditions will significantly increase drying times. Ensure temperatures are above 50°F (10°C) for optimal drying and sealant application.
- Ventilation: Ensure good air circulation around and under the deck to facilitate drying. Remove any obstructions that may block airflow.
Choosing the Right Deck Sealant
Selecting the appropriate deck sealant is crucial for protecting your investment and maintaining the beauty of your outdoor space. This decision involves understanding the different sealant types, considering various factors like climate and deck material, and knowing the characteristics of popular brands. Choosing wisely ensures your deck remains protected from the elements and looks its best for years to come.
Comparing Different Types of Deck Sealants
Deck sealants come in a variety of formulations, each offering unique benefits and drawbacks. Understanding the differences between these options allows you to make an informed decision based on your specific needs and preferences.
- Oil-Based Sealants: Oil-based sealants are known for their deep penetration into the wood, providing excellent protection against water and UV damage. They often enhance the natural grain and color of the wood. However, they typically take longer to dry, have a stronger odor, and require more frequent maintenance compared to water-based options. They are also less environmentally friendly.
- Water-Based Sealants: Water-based sealants are easier to apply and clean up, with a lower odor and faster drying times. They are also more environmentally friendly than oil-based options. While they may not penetrate the wood as deeply, modern water-based sealants offer excellent protection and durability. They are available in a variety of finishes, from clear to solid color.
- Solid Color Stains: Solid color stains are essentially opaque coatings that completely cover the wood grain. They provide the most protection against UV damage and weathering. Solid stains are available in a wide range of colors and offer excellent durability. However, they can obscure the natural beauty of the wood and may require more frequent touch-ups than clear or semi-transparent sealants.
Factors to Consider When Choosing a Sealant
Several factors should influence your choice of deck sealant. Carefully considering these elements will help you select the product best suited for your specific situation.
- Climate: In areas with harsh weather conditions, such as extreme temperatures, heavy rainfall, or intense sunlight, a more durable sealant is necessary. For example, a deck in the arid Southwest might benefit from a sealant with high UV protection, while a deck in the Pacific Northwest would need excellent water resistance.
- Deck Material: The type of wood used for your deck will impact sealant choice. For example, pressure-treated wood often benefits from sealants designed to penetrate and protect, while composite decking may require specific coatings designed for synthetic materials. Some sealants are also designed for specific wood types like cedar or redwood.
- Desired Look: The aesthetic preference plays a significant role. If you want to showcase the natural wood grain, a clear or semi-transparent sealant is best. If you prefer a solid color, a solid color stain is the appropriate choice. Consider the overall design and style of your outdoor space when making your decision.
Examples of Common Deck Sealant Brands and Their Characteristics
Various reputable brands offer a range of deck sealants. Understanding the specific characteristics of these brands can help you make a more informed choice.
- Behr: Behr offers a variety of water-based and oil-based deck sealants and stains, known for their ease of application and availability. Their products often provide good value for the price. Behr products are widely available at Home Depot stores.
- Thompson’s WaterSeal: Thompson’s WaterSeal is a popular brand known for its water-repellent properties. Their products are designed to protect against water damage and are available in various finishes, including clear and tinted options. They are a good choice for general weather protection.
- Cabot: Cabot specializes in high-quality stains and sealants, offering excellent durability and protection. Their products are often favored for their superior performance and are available in a wide range of colors and finishes. They are often a good choice for premium projects.
- Olympic: Olympic offers a range of deck stains and sealants designed for ease of use and protection. Their products are available in various formulations, including solid color stains and clear sealants. They are often a good choice for DIY projects.
Comparing Sealant Types
The following table compares different sealant types based on durability, ease of application, and maintenance requirements:
| Sealant Type | Durability | Ease of Application | Maintenance Requirements |
|---|---|---|---|
| Oil-Based | Good to Excellent (depending on the product) | Moderate (longer drying times, strong odor) | Moderate to High (reapplication every 1-3 years) |
| Water-Based | Good (improving with newer formulations) | Easy (quick drying, low odor) | Moderate (reapplication every 2-4 years) |
| Solid Color Stains | Excellent | Moderate | Moderate (may require touch-ups, reapplication every 3-5 years) |
Applying Deck Sealant
Now that your deck is clean, dry, and ready, the next crucial step is applying the deck sealant. This process protects your deck from the elements and extends its lifespan. Proper application is key to achieving a beautiful and durable finish. Let’s dive into the techniques and best practices for sealing your deck.
Applying Sealant with Different Tools
The tools you use to apply deck sealant will influence the final appearance and the efficiency of the job. You can choose from brushes, rollers, or sprayers.
- Brushes: Brushes are excellent for detail work and applying sealant to intricate areas like railings and spindles. They offer good control and allow you to work the sealant into the wood grain effectively. Use a high-quality brush designed for exterior use and compatible with the sealant type. Apply the sealant in the direction of the wood grain. For a smooth finish, avoid overloading the brush and brush out any drips or runs.
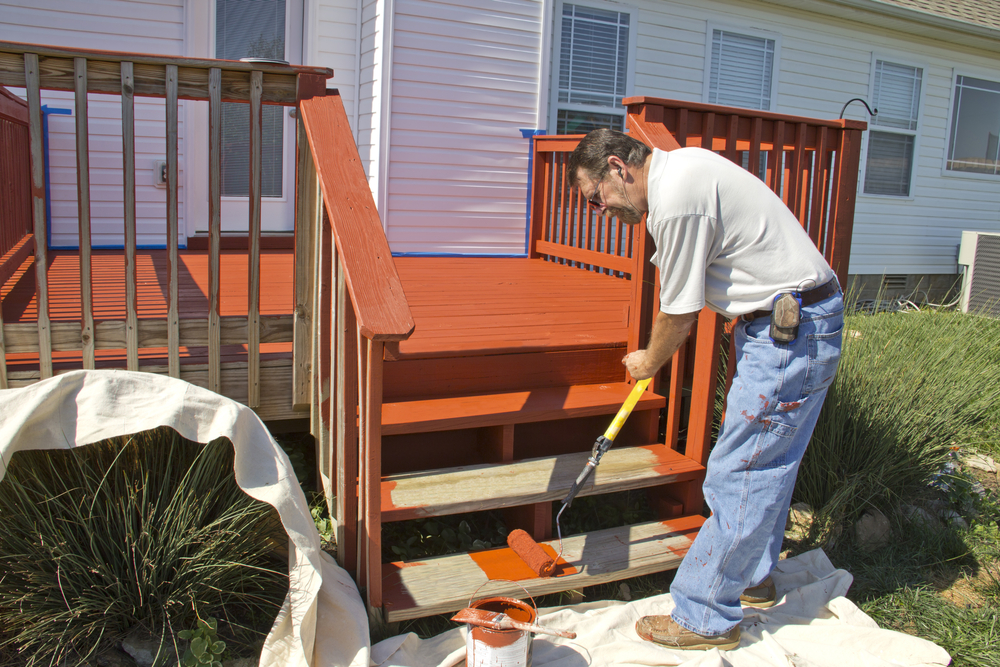
- Rollers: Rollers are a faster option for large, flat surfaces like the deck boards. Choose a roller with the appropriate nap length for your deck’s surface. A longer nap is better for rougher surfaces. Roll the sealant evenly, overlapping each pass to ensure complete coverage. Avoid applying too much sealant, which can lead to puddling.
A good rule of thumb is to maintain a consistent and even coating across the entire surface.
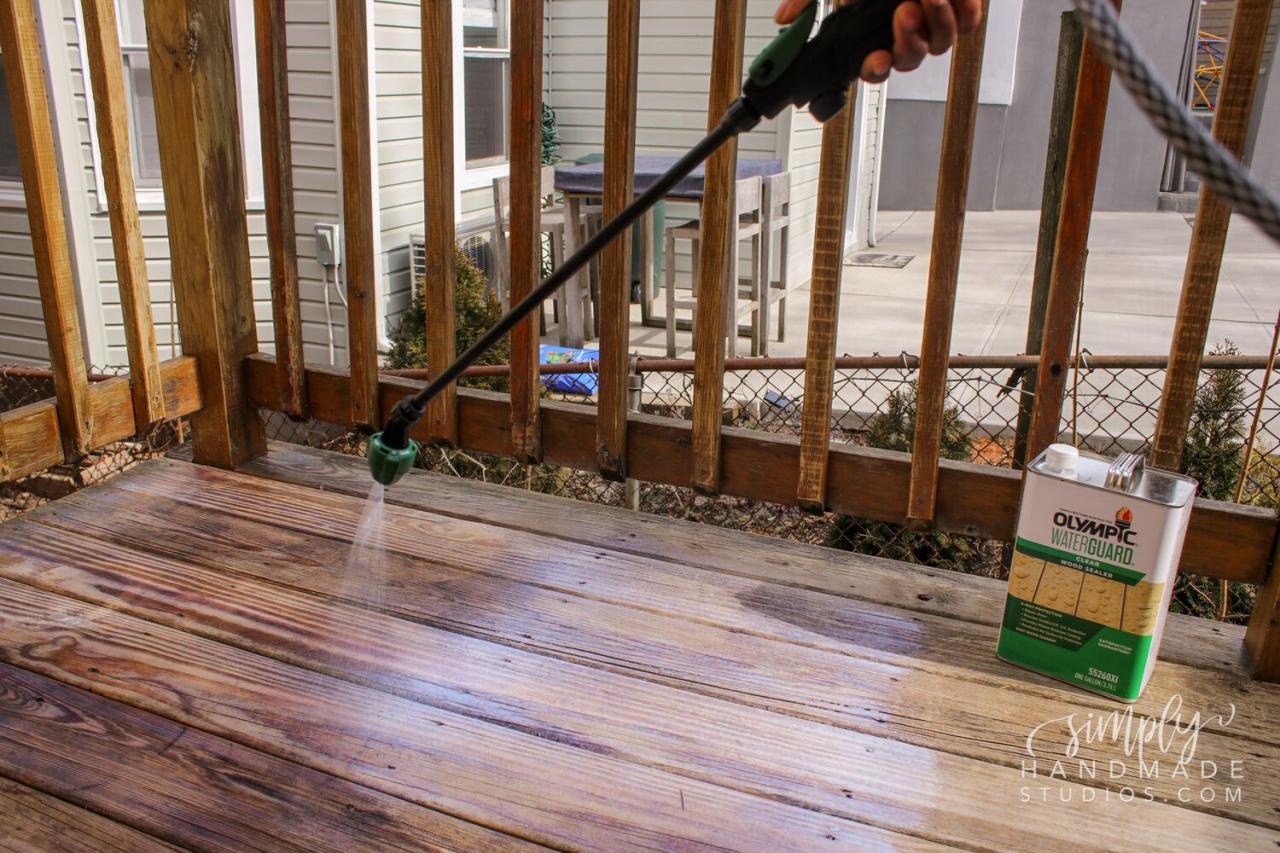
- Sprayers: Sprayers are the fastest method for applying sealant, especially on large decks. They provide an even coating and can reach difficult-to-access areas. However, sprayers require more preparation, including masking areas you don’t want to seal. Always use a sprayer designed for the type of sealant you’re using. Practice on a scrap piece of wood to get the hang of the spray pattern and adjust the settings as needed.
Ensure even coverage, and be mindful of overspray.
Applying Multiple Coats and Drying Times
Applying multiple coats of sealant is essential for optimal protection and longevity. The number of coats needed depends on the sealant type and the condition of your deck. Generally, two to three coats are recommended.
- First Coat: The first coat penetrates the wood and provides the foundation for subsequent coats. Apply it evenly, following the instructions on the sealant container.
- Second and Subsequent Coats: These coats build upon the first, adding extra protection against UV rays, moisture, and wear and tear. Apply the coats in the same manner as the first, ensuring complete coverage.
- Drying Time: Allow sufficient drying time between coats. This is crucial for the sealant to cure properly and to avoid trapping moisture. Check the manufacturer’s instructions for the recommended drying time, which can vary depending on the sealant and weather conditions. Typically, you should wait at least 4-6 hours, and sometimes up to 24 hours, between coats.
Avoiding Common Mistakes During Sealant Application
Avoiding common mistakes during sealant application ensures a professional-looking and long-lasting finish. Here are some common pitfalls to avoid.
- Applying Sealant Too Thickly: Applying too much sealant at once can lead to runs, drips, and an uneven finish. Always apply thin, even coats.
- Not Following Drying Times: Rushing the drying process can prevent the sealant from curing properly, leading to a sticky or uneven surface. Adhere to the recommended drying times between coats.
- Applying Sealant in Direct Sunlight: Applying sealant in direct sunlight can cause it to dry too quickly, leading to lap marks and an uneven finish. Choose a cloudy day or apply sealant in the shade.
- Using the Wrong Type of Sealant: Make sure you are using a sealant appropriate for your deck’s wood type and the climate you live in. For example, a clear sealant may not provide sufficient UV protection in areas with intense sunlight.
- Skipping Surface Preparation: Applying sealant to a dirty or improperly prepared surface will result in poor adhesion and a short lifespan. Ensure the deck is thoroughly cleaned, sanded (if necessary), and completely dry before applying sealant.
Essential Safety Precautions
Safety should always be a top priority when working with deck sealant. Follow these safety precautions to protect yourself and others.
- Wear Protective Gear: Always wear appropriate personal protective equipment (PPE), including safety glasses, gloves, and a respirator. Sealant fumes can be harmful if inhaled.
- Work in a Well-Ventilated Area: Ensure adequate ventilation when applying sealant, either outdoors or in a well-ventilated area. This helps to prevent the buildup of harmful fumes.
- Avoid Open Flames and Sparks: Many sealants are flammable. Keep away from open flames, sparks, and other ignition sources. Do not smoke while applying sealant.
- Read and Follow Manufacturer’s Instructions: Always read and follow the manufacturer’s instructions on the sealant container. These instructions provide important safety information and application guidelines.
- Proper Disposal: Dispose of used sealant, rags, and other materials properly. Follow local regulations for hazardous waste disposal.
- First Aid: Have access to first-aid supplies in case of accidental contact with the sealant, such as eye irritation or skin contact. Consult the sealant’s safety data sheet (SDS) for specific first-aid measures.
Maintaining Your Sealed Deck
Maintaining your sealed deck is crucial for preserving its beauty and extending its lifespan. Regular upkeep prevents premature degradation and ensures your deck remains a safe and enjoyable outdoor space for years to come. Proper maintenance protects your investment and minimizes the need for costly repairs or complete replacement.
Tips for Extending Deck Lifespan
Following these maintenance tips will help prolong the life of your deck. These practices, when consistently applied, can significantly reduce the wear and tear caused by weather and use.
- Regular Cleaning: Sweep or hose down your deck regularly to remove dirt, leaves, and debris. This prevents the buildup of organic matter that can trap moisture and promote mold and mildew growth.
- Prompt Stain Removal: Clean up spills immediately, especially those involving food, drinks, or grease. These substances can penetrate the sealant and damage the wood.
- Inspect for Damage: Regularly inspect your deck for any signs of damage, such as cracks, splinters, or loose boards. Address these issues promptly to prevent them from worsening.
- Protect from Direct Sunlight: If possible, provide shade during the hottest parts of the day. Prolonged exposure to sunlight can degrade the sealant over time. Consider using a deck umbrella or strategically planting trees.
- Avoid Heavy Objects: Refrain from placing heavy objects, like large planters or furniture, in the same spot for extended periods. This can create indentations and damage the sealant.
- Proper Ventilation: Ensure adequate airflow under your deck. Good ventilation helps to prevent moisture buildup, which can lead to rot and mildew.
Signs of Sealant Failure and Addressing Them
Identifying sealant failure early is essential for preventing significant damage to your deck. Recognizing these signs allows for timely intervention, minimizing the scope of repairs and preserving the deck’s structural integrity.
- Water Beading Stops: If water no longer beads up on the surface of your deck after rain, it indicates that the sealant is losing its effectiveness.
- Color Fading or Discoloration: Fading or uneven discoloration of the deck boards suggests that the sealant is breaking down and failing to protect the wood from UV rays.
- Peeling, Cracking, or Blistering: These are clear signs of sealant failure and require immediate attention. They indicate that the sealant has lost its adhesion and is no longer protecting the wood.
- Mold or Mildew Growth: The presence of mold or mildew indicates that moisture is penetrating the sealant and reaching the wood.
To address sealant failure:
- Assess the Damage: Determine the extent of the damage to decide whether spot repairs or a complete resealing is necessary.
- Clean the Deck: Thoroughly clean the deck to remove any dirt, debris, mold, or mildew.
- Repair Damaged Areas: Replace any damaged boards or repair cracks and splinters.
- Sand the Deck (If Necessary): If the existing sealant is severely damaged, you may need to sand the deck to remove the old sealant and prepare the surface for a new coat.
- Apply a New Coat of Sealant: Apply a new coat of sealant following the manufacturer’s instructions.
Resealing Frequency Based on Sealant Type and Conditions
The frequency with which you should reseal your deck depends on several factors, including the type of sealant used and the environmental conditions it is exposed to. Consider these guidelines for optimal protection.
- Water-Based Sealants: Generally, water-based sealants require resealing every 1-3 years. They tend to wear down faster than oil-based sealants, especially in areas with high sun exposure or heavy foot traffic.
- Oil-Based Sealants: Oil-based sealants typically last longer, often requiring resealing every 2-5 years. They offer better protection against UV rays and moisture, but they can be more susceptible to mildew growth.
- Environmental Conditions: Decks exposed to harsh weather conditions, such as intense sunlight, heavy rain, or extreme temperatures, will require more frequent resealing. Decks in shaded areas may last longer.
- Foot Traffic: Decks with high foot traffic will experience more wear and tear, potentially requiring more frequent resealing.
For example, a deck sealed with a high-quality oil-based sealant in a shaded area might only need resealing every 4-5 years, while a deck sealed with a water-based sealant in a sunny, high-traffic area might need resealing every 1-2 years. Regular inspection and monitoring of the sealant’s condition are crucial for determining the optimal resealing schedule.
Proper Cleaning Procedure for a Sealed Deck
Cleaning your sealed deck properly ensures its longevity without damaging the sealant. Using the right methods and products is crucial for preserving the protective layer and maintaining the deck’s appearance.
The following steps Artikel a safe and effective cleaning method:
- Sweep the Deck: Begin by sweeping the deck with a soft-bristled broom to remove loose debris, such as leaves, dirt, and twigs.
- Prepare Cleaning Solution: Mix a mild deck cleaner, specifically designed for sealed decks, with water according to the manufacturer’s instructions. Avoid using harsh chemicals, such as bleach, which can damage the sealant.
- Apply the Cleaning Solution: Apply the cleaning solution to the deck surface using a pump sprayer or a garden sprayer. Ensure even coverage across the entire deck.
- Scrub the Deck (Optional): If there are stubborn stains or mildew, use a soft-bristled brush to gently scrub the deck boards. Avoid using excessive force, as this can damage the sealant.
- Rinse Thoroughly: Rinse the deck thoroughly with clean water using a garden hose with a spray nozzle. Ensure that all the cleaning solution is removed.
- Allow to Dry: Allow the deck to dry completely before using it. This typically takes several hours, depending on the weather conditions.
Visual Illustration:
Imagine a step-by-step visual representation of the cleaning process. The illustration begins with a deck covered in leaves and dirt. The first panel shows a person sweeping the deck with a broom. The second panel depicts the person mixing the cleaning solution in a bucket. The third panel illustrates the person spraying the deck with the cleaning solution using a pump sprayer.
The fourth panel shows the person gently scrubbing the deck with a soft-bristled brush, focusing on a specific stained area. The fifth panel shows the person rinsing the deck with a garden hose. The final panel depicts the deck, now clean and dry, with the sun shining on it.
Wrap-Up

From removing stubborn grime to applying the perfect sealant, the process of cleaning and sealing your deck is a rewarding project that offers significant returns. By following these steps, you can protect your deck from the elements, enhance its appearance, and ensure it remains a beautiful and functional space for years to come. Remember to choose the right products, follow the proper techniques, and regularly maintain your deck to enjoy it to the fullest.
With a little effort, your deck can be a source of pride and enjoyment for many seasons.